CentOS 6.7 に Moodle 3 をインストール

■構築環境

VMware ESXi 5.5
CentOS 6.7
httpd 2.2.15
php 5.4.45
mysql-server 5.5.48(InnoDB,Barracuda)
Moodle 3.0.2

■CentOS 6.7 インストール

minimal desktopを選択

■GUIログイン後

やらなくてもいいけど気になるので、ホームディレクトリ名を日本語から英語へ変更。

$ LANG=C xdg-user-dirs-gtk-update

■epelとremiレポジトリを追加

CentOS6.7標準のリポジトリではPHP 5.3 だが、Moodleの動作要件のPHP5.4をインストールするためリポジトリを追加する。

# rpm -ivh http://dl.fedoraproject.org/pub/epel/6/x86_64/epel-release-6-8.noarch.rpm
# rpm -ivh http://rpms.famillecollet.com/enterprise/remi-release-6.rpm

■必要パッケージインストール

# yum install httpd httpd-devel mysql mysql-server mysql-devel mod_auth_mysql php-mysql php mbstring php-gd php-xml php-mbstring php-xmlrpc php-soap php-intl php-pear php-devel php-opcache php-pecl-zendopcache perl-Net-SSLeay expect --enablerepo=remi

■ホスト名設定

# vi /etc/hosts
# vi /etc/sysconfig/network
# service network restart

■iptable設定

# vi /etc/sysconfig/iptables
tcp/80 を許可
# service iptables restart

■httpd設定

# vi /etc/httpd/conf/httpd.conf
 Listen 10.100.16.1:80
 ServerName moodle:80
# chkconfig httpd on
# service httpd start

■MySQL設定

# chkconfig mysqld on
# service mysqld start
# /usr/bin/mysql_secure_installation
# mysql -u root -p
 create database moodle;
 create user moodle@localhost identified by 'PASSWORD';
 grant all privileges on moodle.* to moodle@localhost identified by 'PASSWORD' with grant option;
 FLUSH PRIVILEGES;
 exit

■Moodleインストール

# wget https://download.moodle.org/download.php/direct/stable30/moodle-latest-30.tgz
# tar xvzf moodle-latest-30.tgz
# cp -pr moodle/* /var/www/html/
# chown -R root /var/www/html
# chmod -R 0755 /var/www/html
# mkdir /var/www/moodledata
# chmod 0777 /var/www/moodledata
# vi /var/www/moodledata/.htaccessa
 order deny,allow
 deny from all
# chown apache /var/www/html
# cd /var/www/html/admin/cli
# sudo -u apache /usr/bin/php install.php
# chown -R root /var/www/html

DBチューニング

# php admin/cli/mysql_compressed_rows.php -s

これの実行結果を実施

# mysql -u root -p
USE moodle;
SET SESSION sql_mode=STRICT_ALL_TABLES;
SET GLOBAL innodb_file_per_table=1;
SET GLOBAL innodb_file_format=Barracuda;
ALTER TABLE mdl_data ROW_FORMAT=Compressed;
ALTER TABLE mdl_data_fields ROW_FORMAT=Compressed;
ALTER TABLE mdl_enrol_paypal ROW_FORMAT=Compressed;
ALTER TABLE mdl_lti ROW_FORMAT=Compressed;
ALTER TABLE mdl_user ROW_FORMAT=Compressed;
ALTER TABLE mdl_user_info_field ROW_FORMAT=Compressed;

■完了

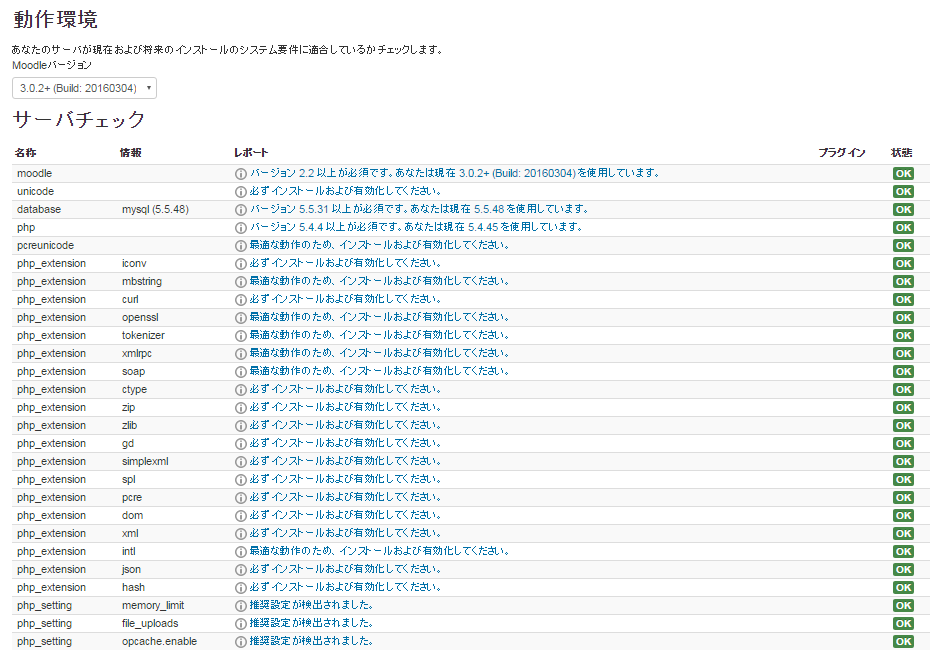
Webでアクセスして「ダッシュボード」-「サイト管理」-「サーバ」-「動作環境」を確認してみる。

moodle


fb: conflicting fb hw usage nouveaufb vs simple – removing generic driver

fb: conflicting fb hw usage nouveaufb vs simple - removing generic driver

みたいなエラーが出てOS起動できない時の対処方法

競合ドライバを読み込まないようにする
シングルユーザモードでも起動できない時もあるので、DVD起動するとかして、

vi /etc/modprobe.d/blacklist.conf

で、これを追加。

blacklist nouveau

VMware 関連 初期ユーザ名、パスワード

vCenter Appliance Configuration Default Username and Password

https://(SERVER_IP):5480

username: root
password: vmware

vCenter Application Discovery Manager Default Username and Password

http://(SERVER_IP)

username: root
password: 123456

vCenter Chargeback Default Username and Password

http://(SERVER_IP):8080/cbmui/

username: root
password: vmware

vCenter Infrastructure Navigator Default Username and Password

https://(SERVER_IP):5480

username: root
password: Given when deploying OVA

vCenter Web Client Configuration Default Username and Password

https://(SERVER_IP):9443/admin-app

username: root
password: vmware

vCenter vSphere Web Client Access Default Username and Password

https://(SERVER_IP):9443/vsphere-client/

username: root
password: vmware

vCenter Single Sign On (SSO) Default Username and Password

https://(Server_IP):7444/lookupservice/sdk

Windows default username: admin@System-Domain
Linux (vApp) default username: root@System-Domain
password: specified during installation

vCenter Orchestrator Appliance Default Username and Password

http://orchestrator_appliance_ip

username: vmware
password: vmware

Orchestrator Client Default Username and Password

username: vcoadmin
password: vcoadmin

Web Operator Default Username and Password

username: vcoadmin
password: vcoadmin

vCenter Orchestrator for Windows Default Username and Password

https://(SERVER_IP):8283 or http://(SERVER_IP):8282
username: vmware
password: vmware

WebViews: http://orchestrator_server:8280.

vCenter Operations (vCOPS) Default Username and Password

Manager: https://(UI_SERVER_IP)
username: admin
password: admin

Administrator Panel:

https://( UI_SERVER_IP)/admin

username: admin
password: admin

CustomUI:

https:// UI_SERVER_IP)/vcops-custom/

username: admin
password: admin

vCloud Connector Node Default Username and Password

https://IPorDNS:5480

username: admin
password: vmware

vCloud Connector Server Default Username and Password

https://IPorDNS:5480

username: admin
password: vmware

vCloud Director Default Username and Password

https://(SERVER_IP)/cloud/

username: administrator
password: given during setup wizard

vCloud Director Appliance Default Username and Password

username: root
password: Default0

OracleXEDatabase

username: vcloud
password: VCloud

VMware Site Recovery Manager Default Username and Password

username: (this is your vcenter admin username)
password: (this is your vcenter admin password)

vShield Manager Default Username and Password

username: admin
password: default

vCenter Mobile Access (vCMA) Default Username and Password

username:root
password: vmware


vyatta キーボードレイアウト変更

■必要パッケージインストール

conf
set system package repository squeeze components main
set system package repository squeeze url http://packages.vyatta.com/debian/
set system package repository squeeze distribution squeeze
commit
save
sudo apt-get update
sudo apt-get install console-tools console-data console-common

■日本語レイアウトへ設定変更

sudo dpkg-reconfigure console-data

「Select keymap from arch list」を選択
「pc / qwerty / Japanese / Standard / Standard」を選択


Redmine on Apache with Passenger(mod_rails)

BitNamiを使わずに、Redmineを使用する方法。Apache,MySQLはインストール済み前提。

■EPELリポジトリ追加
http://kz10.net/memo/2011/1109_021523.html

■Ruby関連ライブラリインストール

yum --enablerepo=epel install libyaml-devel
yum install gcc gcc-c++ make curl-devel readline-devel openssl-devel zlib-devel httpd-devel mysql-devel ImageMagick ImageMagick-devel ipa-pgothic-fonts

■Rubyインストール

wget http://cache.ruby-lang.org/pub/ruby/2.0/ruby-2.0.0-p353.tar.gz
tar xvzf ruby-2.0.0-p353.tar.gz
cd ruby-2.0.0-p353
./configure
make
make install
gem install bundler

■DB設定
DB名:redmine
DBユーザ:redmine
DBパスワード:hogehoge

mysql -u root -p
mysql> create database redmine character set utf8;
mysql> create user 'redmine'@'localhost' identified by 'hogehoge';
mysql> grant all privileges on redmine.* to 'redmine'@'localhost';
mysql> flush privileges;

■Redmineインストール

wget http://www.redmine.org/releases/redmine-2.4.1.tar.gz
tar xvzf redmine-2.4.1.tar.gz
mv redmine-2.4.1 /var/www/html/redmine.hogehoge.net
chown -R apache:apache redmine.hogehoge.kazooo.net
cd /var/www/html/redmine.hogehoge.net
cp config/database.yml.example config/database.yml
vi config/database.yml

DBのパラメータ投入

cp config/configuration.yml.example config/configuration.yml
vi config/configuration.yml

SMTPなどの設定。日本語フォント対策で以下の行追加。
rmagick_font_path: /usr/share/fonts/ipa-pgothic/ipagp.ttf

bundle install --without development test
bundle exec rake generate_secret_token
RAILS_ENV=production rake db:migrate

■Passengerインストール

gem install passenger
passenger-install-apache2-module
vi /etc/httpd/conf.d/passenger.conf

LoadModule passenger_module /usr/local/lib/ruby/gems/2.0.0/gems/passenger-4.0.29/buildout/apache2/mod_passenger.so
PassengerRoot /usr/local/lib/ruby/gems/2.0.0/gems/passenger-4.0.29
PassengerDefaultRuby /usr/local/bin/ruby

/etc/init.d/httpd graceful

■ブラウザでアクセスしてadmin/adminでログイン。


Pydio

Pydioは、

Webサーバ上のファイルを管理するためのPHPのリッチクライアントブラウザです。 一般的なファイル操作、オンラインでのzip閲覧、テキストファイルとイメージプレビューなどの機能が実装されています。ユーザ管理システムとマルチ言語もサポートします。

以前はAjaXplorerの名前でリリースされていました。
https://pydio.com/
・ファイル共有ができます。
・Webブラウザからアクセスできます。
・ビューワー機能があります。
・iPhoneやAndroidからアクセスできます。
・オンプレミスで設置可能。(PHPが動作すればOK)
・プラグインで拡張できます。
・設置するサーバのファイルシステム以外にも、AWS、Samba、FTP、Dropboxなどがマウントできます。


ZABBIXインストール with PostgreSQL

■zabbix-2.0.0-1.el5.JP.src.rpmの入手
どこかで探せ!
■iksemel-develの入手・インストール
RPMsearchで探せ!
# rpm -ivh ./iksemel-1.4-2.el6.JP.i686.rpm ./iksemel-devel-1.4-2.el6.JP.i686.rpm
■zabbixのコンパイル
# cd /usr/local/src/
# cp -p /media/sf_share/zabbix-2.0.0-1.el5.JP.src.rpm .
# rpm -ivh zabbix-2.0.0-1.el5.JP.src.rpm
# yum install rpm-build mysql-devel postgresql-devel net-snmp-devel
openldap-devel gnutls-devel iksemel-devel sqlite-devel unixODBC-devel
libssh2-devel java-devel curl-devel OpenIPMI-devel
# rpmbuild -ba ~/rpmbuild/SPECS/zabbix.spec
こでれ~/rpmbuild/RPMS 以下にRPMが生成される。
■ユーザー追加、パスワード設定
# useradd postgres
# passwd postgres
■PostgreSQLの準備
インストール
# yum install postgresql-server
起動
# chkconfig postgresql on
# /etc/init.d/postgresql start
DBクラスタ初期化
# su – postgres
$ initdb
zabbix用ユーザ作成
$ createuser -U postgres zabbix
zabbix用DB作成
$ createdb -U zabbix zabbix_db
DBの構築
$ psql -U zabbix zabbix_db < /root/rpmbuild/BUILD/zabbix-2.0.0/database/postgresql/schema.sql $ psql -U zabbix zabbix_db < /root/rpmbuild/BUILD/zabbix-2.0.0/database/postgresql/images.sql $ psql -U zabbix zabbix_db < /root/rpmbuild/BUILD/zabbix-2.0.0/database/postgresql/data.sql ■fpingの入手・インストール どこかで探せ! # rpm -ivh ./fping-2.4b2-16.el6.JP.i686.rpm ■Zabbixのインストール # cd /root/rpmbuild/RPMS # yum install php-pgsql httpd php php-bcmath php-gd php-mbstring php-xml # rpm -ivh i386/zabbix-2.0.0-1.el6.i386.rpm i386/zabbix-agent-2.0.0-1.el6.i386.rpm i386/zabbix-server-2.0.0-1.el6.i386.rpm i386/zabbix-server-pgsql-2.0.0-1.el6.i386.rpm i386/zabbix-web-pgsql-2.0.0-1.el6.i386.rpm noarch/zabbix-web-2.0.0-1.el6.noarch.rpm ■Zabbix初期設定 # vi /etc/zabbix/zabbix_server.conf DBName=zabbix  ↓ DBName=zabbix_db DBUser=root  ↓ DBUser=zabbix # DBPassword=  ↓ DBPassword= ■ポート開放 # vi /etc/sysconfig/iptables 以下追加 -A INPUT -m state --state NEW -m tcp -p tcp --dport 10050 -j ACCEPT # /etc/init.d/iptables restart ■サービス起動 # /etc/init.d/zabbix-server start # /etc/init.d/zabbix-agent start # /etc/init.d/httpd start # chkconfig zabbix-server on # chkconfig zabbix-agent on # chkconfig httpd on ■初期設定 http://localhost/zabbix/ へアクセス Database type PostgreSQL Database server localhost Database port 0(default) Database name zabbix_db Database user zabbix Database password Zabbix server localhost Zabbix server port 10051 Zabbix server name zabbix ■管理ページログイン 初期ユーザ Admin/zabbix =========================================================================== 【zabbixクライアントインストール】 ■Agentインストール zabbixサーバ作るときにコンパイルしたやつを使うよ # rpm -ivh zabbix-2.0.0-1.el6.i386.rpm # rpm -ivh zabbix-agent-2.0.0-1.el6.i386.rpm ■ポート開放 # vi /etc/sysconfig/iptables 以下追加 -A INPUT -m state --state NEW -m tcp -p tcp --dport 10050 -j ACCEPT # /etc/init.d/iptables restart ■自動起動 # chkconfig zabbix-agent on # /etc/init.d/zabbix-agent start ■Agent設定 # /etc/zabbix/zabbix_agentd.conf Server=127.0.0.1  ↓ Server=192.168.xxx.xxx


ページ:1234567